
Multifunctional Caregiver Mannequin | Injection, Catheterization & Nursing Training Simulations for Male & Female

Reference product link:https://www.yddol.com/products/77.html
1. This model is suitable for use in healthcare, nursing schools, and medical colleges for nursing teaching purposes.
2. The model is made entirely of PVC material, which is durable, sturdy, and lightweight for easy handling.
3. All joints of the model are movable, and the waist can also bend. All parts can be assembled and disassembled.
4. Teaching and operational tasks for this model:
Joint screws fixed, free movement
Washing head and face
Eye and ear cleaning, administering drops
Oral care, denture care
Tracheotomy care
Oxygen inhalation therapy
Stomach washing method
Intracardiac injection method
Basic heart resuscitation first aid
Pneumothorax
Thoracentesis
Liver puncture
Abdominal puncture
Bone marrow puncture
Lumbar puncture
Deltoid injection
Female external genitalia washing
Arm venous injection
Arm venous puncture
Arm venous infusion
Female catheterization
Arm muscle injection
Full body care: sponge bath, dressing
Breast care
5. Model operation instructions:
All injection and puncture sites are made with soft plastic for both large and small needle pieces. Each needle piece has a small plastic bottle, which can hold 20CC of liquid, which can be used for liquid withdrawal demonstration before practice.
The mouth and nose can be used for oxygen administration, nasogastric feeding, and stomach washing (the stomach is replaced with a tubular bag for teaching purposes).
For intravenous injections, large needle pieces are used on the buttocks, with an inner tubing (simulating a vein). When injecting, liquid must be injected into the tubing. For large volumes of glucose infusion, the exposed tubing on the upper buttocks must be placed in a container, and the clamp must be released to allow the liquid to flow. For blood withdrawal demonstrations, a small amount of liquid can be injected into the tubing, and then the tubing’s top must be clamped.
When injecting or puncturing, attention must be paid to the center of the needle piece.
Subcutaneous and intramuscular injection methods are the same as clinical practice, where liquids can be injected, and spongy material inside can absorb water. This material can also be removed and squeezed out. When removing the needle, do not apply too much force. It’s best to press lightly on the needle piece with your fingers and then withdraw the needle.
During chest compressions for heart resuscitation teaching, hands should be placed on the lower 1/3 of the sternum, pressing down to a depth of 2.5 cm. When a "whooshing" sound is heard from the chest, release the pressure and allow the chest to return to its normal position. The battery can be replaced when depleted.
6. If the injection or puncture needle piece is damaged after extended use, it can be replaced. Simply unscrew the iron rod at the waist, separating the body into two parts to inspect the internal structure. Unscrew the small plastic bottle, remove the damaged needle piece, and replace it with a new one. Then screw the small plastic bottle back in. Damaged needle pieces in the buttocks and arms can be pulled out and replaced with new ones. Spare needle pieces are included with each model.
7. Catheterization and enema demonstrations can be performed by inserting tubing for teaching purposes (without liquid flow).
8. Stomach washing and nasogastric feeding demonstrations involve inserting a nasal tube into the esophagus. Before insertion, press the lower lip inward with a finger and then insert the tube. Liquids can then be introduced into the internal tubular bag. (During liquid infusion, clamp the tubular bag at the lower part of the body. Release the clamp to allow the liquid to flow.)
9. After each practice session, check if the liquid inside the tubular bag has been emptied and wipe it clean.
10. Plastic model usage and maintenance:
This model is made from both soft and hard plastic.
To facilitate operation, lubricating powder (such as talcum powder) can be applied to areas of frequent use, such as injection sites. Clean after use.
If the model becomes dirty, it can be cleaned with a small amount of detergent or mild soapy water and wiped with a clean cloth.
The model should be stored in a cool, dry place, avoiding exposure to direct sunlight, and covered with a protective cover.
 Advanced Arm Blood Pressure Training Model
 Advanced Upper Arm Muscle Injection & Comparison Model w
 Advanced Gluteal Muscle Injection & Anatomical Structure
 Advanced Gluteal Muscle Injection Training & Comparison
 Advanced Electronic Gluteal Injection Training Model
 Advanced Insulin Injection Training Model
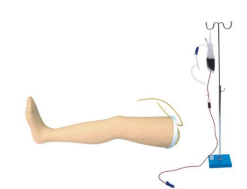 Advanced Venous Infusion Leg Model
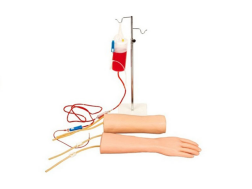 Hand & Elbow Combined IV Training Arm Model


-
Guangzhou, Guangdong, China